
School Academics module allows you to carry out all the tasks required you to manage the school academics better and efficiently. All the activities to manage and enhance the management of school academics can be carried out very easily and fast. You can carry out all the office academic tasks like creating Classes, branch, department, subjects, assignment, and time-table, etc. very easy for Crawlink Users.
First, we will create Create Department, Course, Branch, Year, Semester, Class, and Section
Procedure to Create, view, edit and delete Department:
- Login into Crawlink School ERP using your email or phone number.
- Click on Academic and Then Click Branch, Class & Section.
- The course structure page will be displayed.
- Click on Department.
- Click on Create new department in the right corner of the Page, It will open a create department dialog.
- Fill all details then click the save button. Department created successfully.
- In the right corner of the Department, click on Verticle Ellipsis it will display More options.
- In More option we have:
- View,
- Delete.
- Click on View: It will Open View Department dialogue, In this view dialog, We will get the details of Department, and also we have one more buttons Edit, click on edit It will Open Edit Department dialog, In this Edit dialog, We can Update or Modify the Department details. (*)We have one more option for view if we click on name link, View dialog will open.
- Click on Delete: It will Display Delete dialog with info Message If you click delete, the Department will be deleted Permanently.
Following are the Images to Create, view, edit and delete Department:


Procedure to Create, view, edit and delete Course:
- Login into Crawlink School ERP using your email or phone number.
- Click on Academic and Then Click Branch, Class & Section.
- The course structure page will be displayed.
- Click on Course.
- Click on Create new Course in the right corner of the Page, It will open a create Course dialog.
- Fill all details then click the save button. the Course created successfully.
- In the right corner of the Course, click on Verticle Ellipsis it will display More options.
- In More option we have:
- View,
- Delete.
- Click on View: It will Open View Course dialog, In this view dialog, We will get the details of Course, and also we have one more buttons Edit, click on edit It will Open Edit Course dialog, In this Edit dialogue, We can Update or Modify the Course details. (*)We have one more option for view if we click on name link, View dialog will open.
- Click on Delete: It will Display Delete dialog with info Message If you click delete, the Course will be deleted Permanently.
Following are the Images to Create, view, edit and delete Course:


Procedure to Create, view, edit and delete Branch:


Procedure to Create, view, edit and delete Branch:
- Login into Crawlink School ERP using your email or phone number.
- Click on Academic and Then Click Branch, Class & Section.
- The course structure page will be displayed.
- Click on Branch.
- Click on Create new Branch in the right corner of the Page, It will open a create Branch dialog.
- Fill all details then click the save button. Branch created successfully.
- In the right corner of the Branch, click on Verticle Ellipsis it will display More options.
- In More option we have:
- View,
- Delete.
- Click on View: It will Open View Branch dialog, In this view dialog, we will get the details of Branch, and also we have one more buttons Edit, click on edit it will Open edit Branch dialog, In this Edit dialog, We can Update or Modify the Branch details. (*)We have one more option for view if we click on name link, View dialog will open.
- Click on Delete: It will Display Delete dialog with info Message If you click delete, the Branch will be deleted Permanently.
Following are the Images to Create, view, edit and delete Branch:


Procedure to Create, view, edit and delete Year:


Procedure to Create, view, edit and delete Year:
- Login into Crawlink School ERP using your email or phone number.
- Click on Academic and Then Click Branch, Class & Section.
- The course structure page will be displayed.
- Click on Year.
- Click on Create new Year in the right corner of the Page, It will open a create Year dialog.
- Fill all details then click the save button. Year created successfully.
- In the right corner of the Year, click on Verticle Ellipsis it will display More options.
- In More option we have:
- View,
- Delete.
- Click on View: It will Open View Year dialog, In this view dialog, We will get the details of Year, and also we have one more buttons Edit, click on edit It will Open Edit Year dialog, In this Edit dialog, We can Update or Modify the Year details. (*)We have one more option for view if we click on name link, view dialog will open.
- Click on Delete: It will Display Delete dialog with info Message if you click delete, the Year will be deleted Permanently.
Following are the Images to Create, view, edit and delete Year:


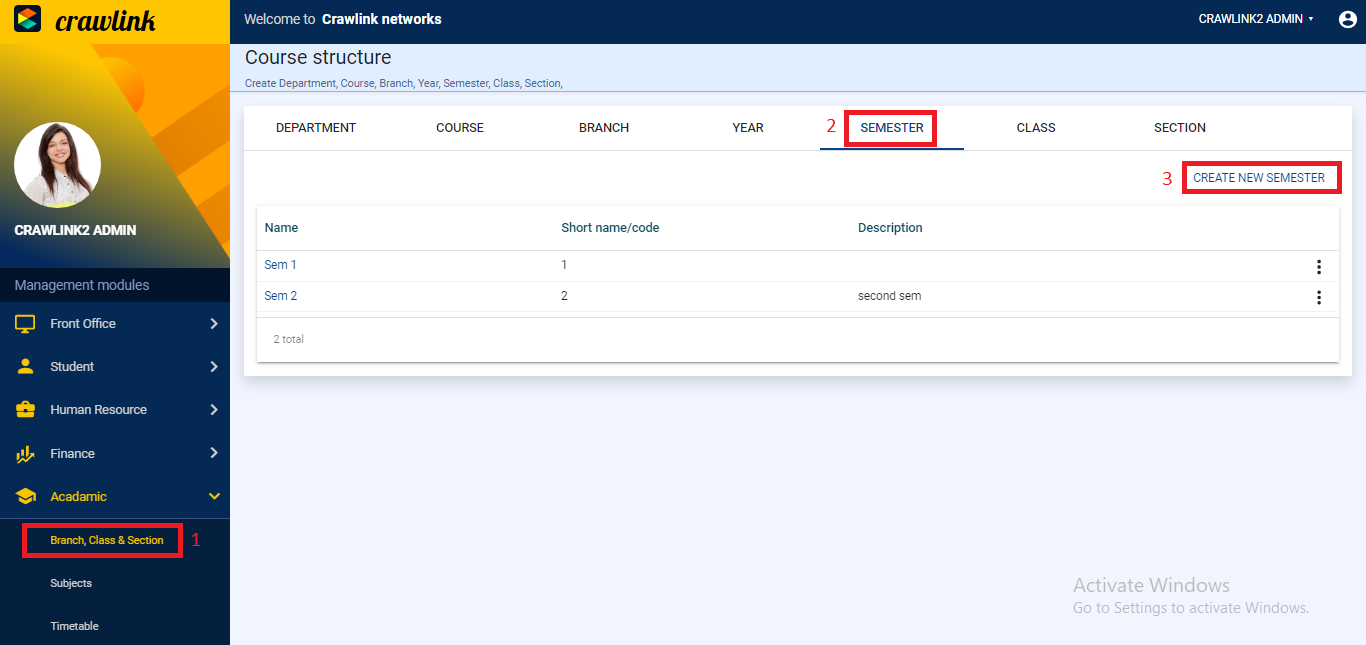
Procedure to Create, view, edit and delete Semester:


Procedure to Create, view, edit and delete Semester:
- Login into Crawlink School ERP using your email or phone number.
- Click on Academic and Then Click Branch, Class & Section.
- The course structure page will be displayed.
- Click on Semester.
- Click on Create new Semester in the right corner of the Page, It will open a create Semester dialog.
- Fill all details then click the save button. Semester created successfully.
- In the right corner of the semester, click on Verticle Ellipsis it will display More options.
- In More option we have:
- View,
- Delete.
- Click on View: It will Open View Semester dialog, In this view dialog, We will get the details of Semester, and also we have one more buttons Edit, click on edit It will Open Edit Semester dialog, In this Edit dialog, We can Update or Modify the Semester details. (*)We have one more option for view if we click on name link, view dialog will open.
- Click on Delete: It will Display Delete dialog with info message if you click delete, the Semester will be deleted Permanently.
Following are the Images to Create, view, edit and delete Semester :


Procedure to Create, view, edit and delete Class:


Procedure to Create, view, edit and delete Class:
- Login into Crawlink School ERP using your email or phone number.
- Click on Academic and Then Click Branch, Class & Section.
- The course structure page will be displayed.
- Click on Class.
- Click on Create new Class in the right corner of the Page, It will open a create Class dialog.
- Fill all details then click the save button. The class created successfully.
- In the right corner of the Year, click on Verticle Ellipsis it will display More options.
- In More option we have:
- View,
- Delete.
- Click on View: It will Open View class dialog, In this view dialog, We will get the details of the class, and also we have one more buttons Edit, click on edit It will Open Edit class dialogue, In this Edit dialogue, We can Update or Modify the class details. (*)We have one more option for View If We Click on name link, View dialog will open.
- Click on Delete: It will Display Delete dialog with info Message If you click delete, the class will be deleted Permanently.
Following are the Images to Create, view, edit and delete class:


Procedure to Create, view, edit and delete Section:


Procedure to Create, view, edit and delete Section:
- Login into Crawlink School ERP using your email or phone number.
- Click on Academic and Then Click Branch, Class & Section.
- The course structure page will be displayed.
- Click on Section.
- Click on Create new Section in the right corner of the Page, It will open a create Class dialog.
- Fill all details then click the save button. The Section created successfully.
- In the right corner of the section, click on Verticle Ellipsis it will display More options.
- In More option we have:
- View,
- Delete.
- Click on View: It will Open View Section dialog, In this view dialog, We will get the details of the Section, and also we have one more buttons Edit, click on edit It will Open Edit Section dialog, In this Edit dialog, We can Update or Modify the Section details. (*)We have one more option for View if we click on name link, View dialog will open.
- Click on Delete: It will Display Delete dialog with info Message If you click delete, the Section will be deleted Permanently.
Following are the Images to Create, view, edit and delete Section:


Comments
Post a Comment